Building a clay oven
Duncan Glendinning here, founder of The Thoughtful Bread Company. I recently appeared in the new series of the BBC2 show "It's not easy being green", when James Strawbridge from New House Farm came to visit and we built a clay oven in my back garden. Having built a couple before, I thought I would share my experience here for those who want to have a go themselves, so I hope what's below is helpful. I am happy to answer any questions you may have as well, so don't hesitate to get in touch with me by emailing duncan@thethoughtfulbreadcompany.com.
Missed us on TV?
![]() If you missed us on TV you can view the episode again on BBC IPlayer by clicking here.
If you missed us on TV you can view the episode again on BBC IPlayer by clicking here.
Why Build a Clay Oven?
It's very cheap - If you network with your local freecycle group and get in touch with a local building company, you should be able to get hold of all the building materials you will need to build your very own wood-fired clay oven.
It's great fun - working with clay (like working with dough) is extremely therapeutic. Take the time out, get your friends, children or parents involved and make it something to enjoy.
It's useful - it's not just about the building. Once finished, you'll have a working wood-fired oven to cook pizzas, bread and more in
![]()
What will I need?
To build a basic clay oven you will need, bricks (or something heat resistant and flat to use as the base of the oven), a quantity of sand, some clay, and something to create a good, strong base.
The beauty of building your own clay oven is that it can be done using scrap and salvaged material and you needn't spend anything on it at all except a little of yours and your friends or family's time. And, given that it is built with scrap in the first place, you needn't worry if your first attempt isn't a complete success, just start again as nothing is wasted!
![]()
Where can I get the clay?
If you are based in Bath then you will no doubt be aware that there is an abundance of clay underneath the topsoil in this area. This is what we used to build our oven.
If you are not from Bath, and in any case, do what we did: approach a few local building companies, and tell them you want some bog standard clay that they mostly likely regularly dig up when excavating before laying foundations. They have to pay to have this disposed of, so will most likely be very happy for you to take some off their hands, and everyone is a winner.
Knowing what is and what isn't good clay is the tricky part. As we had two very different types of clay I decided to make a mini, mug-sized version of a clay oven, and then baked it in my oven on a high heat (220-250 Degrees C) until hard, and then just decided on which of the two cracked the least and looked the strongest. Not very scientific I know, but it worked for us, and you have to except that you will need to experiment a little.
Clay should be fairly clear of debris (rocks, etc..) be quite smooth, and pliable when a little water is added to it.
You will need to do what James Strawbridge and I did, which was to lay down a tarp, dump the clay on it, and start treading it (barefoot if you are brave, with wellies or shoes on if you are not), very slowly adding water, until it is soft enough that you can work with it, and it doesn't crumble or tear easily, but hard enough that it isn't sloppy. You have to remember that the more water you introduce into the clay, the longer it will take to dry, the more it will shrink and therefore the more likely it is to crack as it dries.
![]()
Step 1: Building the base
Building a good, strong, dense and well-insulated base is (as we have learnt) very important. For the oven to work, it needs to absorb as much heat as possible and get up to temperature... allowing it to lose heat will only slow down the process. Our oven (as pictured in Fig 3) was built on a base of pallets with a layer of bricks with no mortar to seal the gaps between them. It works, but could be drastically improved by building a base (which can be made to look quite good as well) using old rubble, rock, other materials of solid mass, even glass bottles would work well. You will not be able to move the oven once it is built, so plan where you want to site your oven carefully.
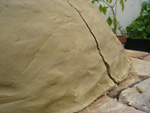
Step 2: Creating the sand form
To achieve the dome shape you need some sort of mould, template or shape to support the clay. I have seen people build the oven by first creating a structure out of willow and other branches, but we chose to build a sand form. Simply create an igloo/dome out of sand, the size you will want the inside of your oven to be. Figure 2 shows the sand form completed, which we then covered in wet newspaper in preparation for the clay.
Step 3: Building up the clay over the sand form
This part of the process is quite critical and should not be rushed. What you are aiming to do is follow the shape of the sand form, without actually putting any real pressure on it, as otherwise you risk deforming your sand form and ending up with a funny looking shape. The best thing is to take chunks of clay at a time, working from the base up, and working your way around the oven gradually. Make sure you bind each piece of clay to the one you are adding it to, and put plenty of pressure on the clay (but not on the sand!).
Make sure you keep the same thickness throughout, we did this by deciding on a number of fingers of thickness we wanted, and making sure it is the same thickness right the way around.
Once done, smooth off the outside of the oven.
Step 4: Carving out the door and scooping out the sand
Once you have given the oven some time to firm up (we left it 3-4hours), you will want to carve out the door. The key magical number here is 63%. The height of the door needs to be 63% of the height of the inside of the oven. If you make the door shorter the smoke won't evacuate and it will suffocate the fire. If you make the door too tall, the fire will burn too quickly and lose heat. This is a key part of the process so take time when planning the size of your oven.
Once you have worked this out, carve the door with a sharp knife, and let the oven set a little more for another 3 or so hours (see fig. 4).
You are now ready to remove the door and scoop out the sand. The newspaper was put in there as it will stick to the clay and is a good indicator that you have reached the clay and do not need to dig any further to remove the sand (see fig. 5). No need to remove the newspaper unless it comes away easily, as it will burn off when you first fire up the oven.
If you have the patience, and whilst the inside of the oven is still soft, use your fingers to smooth the clay surface off, just as you did on the outside.
Step 5: Let it dry!!! And fix and cracks
We cannot stress enough how important it is that you give the oven time to dry. Be patient! If, like us you choose to light the fire too early, you will risk causing more cracking and making the oven more fragile, so give it a week to dry off naturally.
It is inevitable that the oven will have some cracks. See below for a section on cracks. Do not worry about these, just patch them up with some of the fresh clay you had left over from building the oven. This will not affect how the oven will perform that much so you needn't lose any sleep over it.
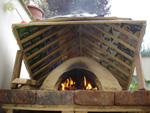
Step 6: Light your fire
This is it!! You have put in all the work, taken the time to let it dry, and it should now be feeling very hard, dry and strong. It will have shrunk a fair bit as well, but no need to worry.
We use a variety of wood to fire the oven with (see fig. 6).
Ensure the wood is:
- Dry and well-seasoned: if the wood is not dry, it will introduce moisture into the oven, which will slow the oven from heating up, and could damage the oven as well.
- Untreated: If using scrap wood, make sure it has not been treated, as some chemicals used in the treatment of wood are very harmful and you don't want them anywhere near your food.
- Small: Ensure you cut your wood so that it is kindling-sized. We have heard different bits of advice about what types of wood to burn, etc.. but in our experience the smaller the wood, the quicker it will burn and therefore the quicker it will release it's heat, which is what we want.
Step 7: Baking
You are all set! You will need to carve some sort of door for the oven, and the rule of thumb is that whilst you can cook pizzas(see fig. 8) in the oven by pushing all the embers to the edges and giving the base a quick brush, you would normally get the oven really hot, remove the fire, put your bread in and seal it with the door if baking bread or loaves. That said, we have managed fine baking rolls and larger loaves in the oven with the fire still lit (see fig. 7)
![]()
A word on cracking
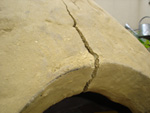
Don't panic!!
Cracking is a natural process. More or less cracking will occur, depending on how much water you introduced into the clay to get it soft enough to work with, and how quickly the oven dries out.
As it dries, the clay will contract, the oven will shrink away a little and cracking may occur.
To avoid cracking, ensure you do not rush the drying out and give it as much time as possible. Do not attempt to dry the oven by lighting a small fire in it unless you are pushed for time; and if the sun is shining consider covering the oven so it is left to dry in the shade.
Once the oven looks like it is dry, use some of the clay you kept aside and fill the cracks. You may have to repeat this process a few times as the clay you will fill the cracks with is likely to crack itself. Do not lose patience, it will sort itself out in the end.
TOP TIPS
These are just some tips we picked up along the way, so thought we would share them with you.
- Plan the size of your oven carefully, ensuring you measure the height of your sand form when it is done so you can work out what the height of the door will need to be.
- Ensure you have kept some spare clay aside to use to fill any cracks.
- Make sure you have all your wood for burning ready, cut to size and dry.
- Get yourself one of those oven thermometers so you can put them in the oven and monitor the temperature.
![]()
Added Extras: A shelter or roof, Clay ovens don't like rain!
Clay ovens don't like rain!! I found this out the hard way, a couple of days before the BBC were due to come back and film us baking in the oven for the first time. A heavy downpour, (and distinct lack of roof) meant that a lot of the clay turned back to a soft mush. Luckily it dried out in time, and no lasting damage ensued.
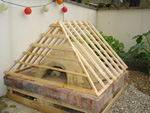

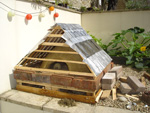
I built my shelter using pallet wood for the frame and drinks cans to create a sort of aluminium-tiled roof. It works well as it is light-weight, completely weatherproof, and I simply tilt it up when I want to use the oven if there is a chance of a shower, or remove it completely if the sun is out.
![]()
Buy the book

I learnt everything I know about building clay ovens from this book. I cannot recommend it enough, which is why we have contacted the publishers and are available to offer it to those interested at the fantastic price of £11 including postage to mainland UK. Visit our shop for more information, but this book is an easy to read absolute must for beginners and experienced oven-builders alike with 130 pages of photos and detailed instructions for you to follow.
Buy the book now! Also makes a great present.
NEED HELP?
We are happy to answer any questions you may have about building ovens. We also plan to run oven-building courses in 2009, and also offer an oven building service if you would like to have one but don't want to build one.
Get in touch, we'd love to hear from you.

Fig 1: Tread the clay

Fig 2: The sand form covered
in newspaper
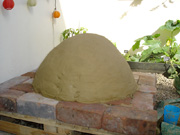
Fig 3: The sand form, now covered with the clay
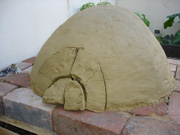
Fig 4: Carving out the door
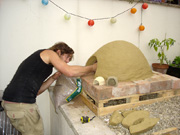
Fig 5: Scooping out the sand
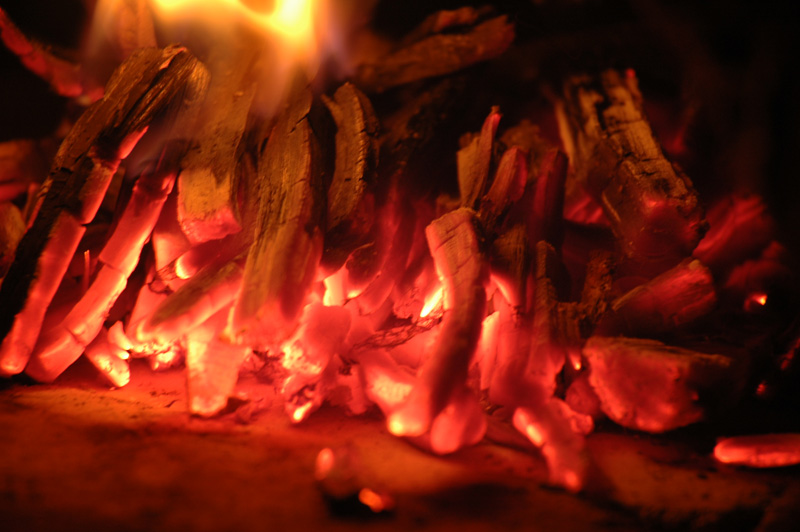
Fig 6: Burning kindling for a bright, hot flame
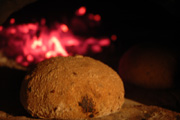
Fig 7: A Wholemeal and spelt roll cooking in the oven
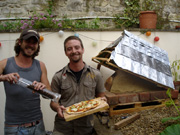
Fig 8: A lovely
wood-fired pizza